For many IT pros, having a lab where different scenarios and configurations can be reproduced is essential. This allows to understand how and why things work the way they do. While some people learn by reading concepts or watching training videos. Others, like me, learn by doing. I heavily rely on my lab, where I can test and break things.
Recently, I worked on an incident where the EAP-TTLS WiFi scenario was not working as expected. The devices were Intune-managed, and they connected to a WiFi network without issue. However, when the devices synced with Intune, the WiFi was disconnected. For WiFi and VPN authentication, I usually use the Network Policy Server, or NPS as my RADIUS server solution. However, NPS does not support EAP-TTLS, so I had to come up with an alternative.
In this post, I will share how I built an 802.1x WiFi auth lab for EAP-TTLS using a Raspberry Pi 3. I will walk you through the steps to set this up, including the configuration files needed to make it work. Note that other authentication protocols can be configured, but I will focus on EAP-TTLS as this is the one, I was interested in.
But why use a Raspberry Pi device for the lab? Well, this device is part of my son’s game device collection. He unknowingly volunteered to lend his device for the cause. (Thanks, son! I hope you understand one day.) However, I would use any physical device as long as it has a WiFi NIC, which is the interface that will provide connectivity to the devices, and an Ethernet interface used to manage and connect the device with the network.
Let’s jump into the configuration: The device comes with a pre-installed OS and configuration. While you can adapt this configuration, I prefer and suggest starting fresh. Install a new Ubuntu image, which can be downloaded and installed using the Raspberry Pi Imager tool.
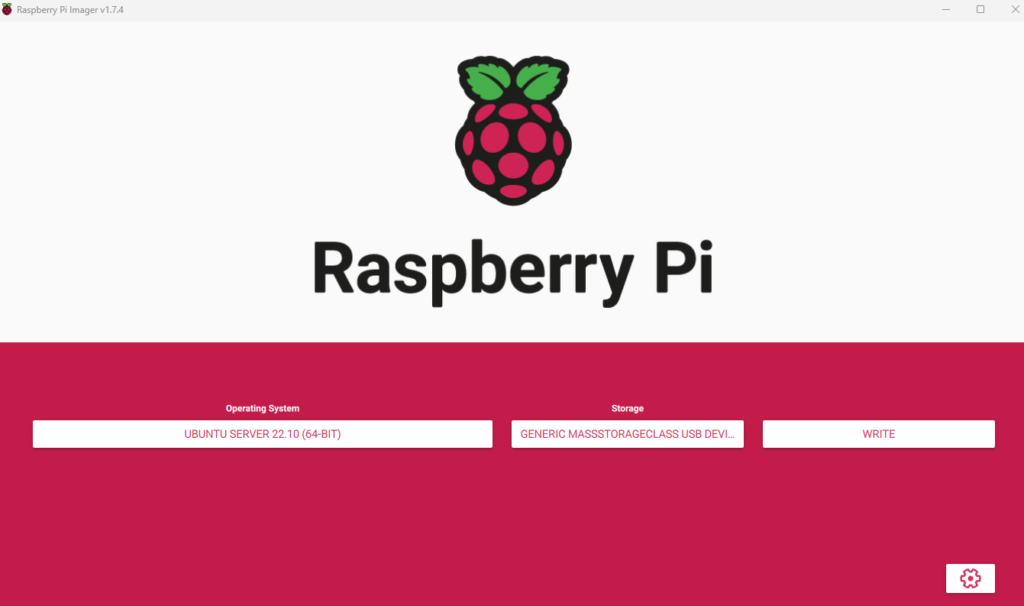
To install the OS image, run the tool and select the operating system and storage where you are going to install the OS image. In my case:
* Operating System -> Other general-purpose OS -> Ubuntu -> Ubuntu Server 22.10 (64-bit). //By the time you read this, you may find a newer version of the OS.
* Select the storage where the OS will be installed. // In my case, it is a 32 GB micro-SD memory.
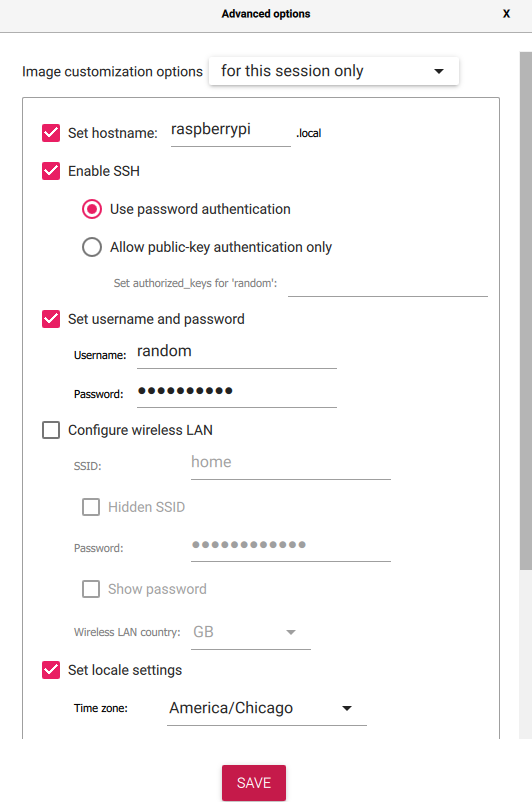
To access the advanced options, click on the gear icon. From there, you can configure the hostname, enable SSH for remote management, set a username and password, and select the time zone.
After saving the changes, start the installation process. This will erase all the previous data on the micro-SD memory card and install the operating system with the values you have set. The installation process should take a few minutes, and in my case, it took no more than 5 minutes.
Once you have enabled SSH, you won’t be able to connect remotely unless you have a DHCP server and know the exact IP address the device has received. Therefore, you will need a monitor and a keyboard to configure the Ethernet interface. To keep things simple, assign a static IP address to this interface. Netplan is the Ubuntu network configuration tool you can use to edit the configuration file. To do this, run the command sudo nano /etc/netplan/50-cloud-init.yaml Your configuration should look similar to the following (use your IP address space for file configuration):
network:
    ethernets:
        eth0:
            dhcp4: no
            addresses:
            - 40.0.0.10/24
            nameservers:
              addresses:
              - 172.31.191.225
            routes:
                - to: default
                  via: 40.0.0.1
    version: 2
Note that Netplan is based on a YAML-based configuration where indentation is crucial. If the configuration file’s format is invalid, you will encounter an error while trying to apply the configuration file. Once you have edited the file, apply it by running the command sudo netplan apply.
Now that we have network connectivity, let’s proceed with installing the latest OS updates by running the commands sudo apt update and sudo apt upgrade. It is also recommended to install the networking tools, such as net-tools, which provide useful utilities like ifconfig. You can install net-tools by running sudo apt install net-tools.
Next, you will need to install two essential packages: dnsmasq and hostapd. Dnsmasq provides DNS and DHCP capabilities for the Wi-Fi clients, while hostapd acts as the WLAN controller, RADIUS client, and RADIUS server. You can install these packages by running the command sudo apt install dnsmasq hostapd.
Please note that right after the dnsmasq installation completes, the service will try to start and may fail.
Mar 17 20:21:21 raspberrypi systemd[1]: Starting dnsmasq - A lightweight DHCP and caching DNS server...
Mar 17 20:21:21 raspberrypi dnsmasq[1268]: dnsmasq: failed to create listening socket for port 53: Address already in use
Mar 17 20:21:21 raspberrypi dnsmasq[1268]: failed to create listening socket for port 53: Address already in use
Mar 17 20:21:21 raspberrypi dnsmasq[1268]: FAILED to start up
Mar 17 20:21:21 raspberrypi systemd[1]: dnsmasq.service: Control process exited, code=exited, status=2/INVALIDARGUMENT
Mar 17 20:21:21 raspberrypi systemd[1]: dnsmasq.service: Failed with result 'exit-code'.
Mar 17 20:21:21 raspberrypi systemd[1]: Failed to start dnsmasq - A lightweight DHCP and caching DNS server.
This is occurring because the port is already being used by the systemd-resolved service. You can choose to disable systemd-resolved or simply disable the DNS capability of dnsmasq, which is what I did (as you can see in the “Disable DNS server capability” entry in the dnsmasq.conf file below). systemd-resolved is sufficient for name resolution, and once you make this change, the service should start without any issues.
Once both packages are installed, proceed creating the configuration files for them.
DNSMASQ
Rename the original dnsmasq configuration file so you can preserve the original file in case you need something from it run: sudo mv dnsmasq.conf dnsmasq.conf.original. then create a new, empty, /etc/dnsmasq.conf file and configure as follow: sudo nano /etc/dnsmasq.conf
	# Set the Wireless interface
	interface=wlan0

	# Set DHCP IP pool range
	dhcp-range=192.168.200.2,192.168.200.10,255.255.255.0,12h

	# Set the gateway IP address
	dhcp-option=3,192.168.200.1

	# Set DNS server address
	dhcp-option=6,172.31.191.225

	# Disable DNS server capability
	port=0
Then apply the configuration file: sudo dnsmasq -C /etc/dnsmasq.conf
Next, configure the wlan interface which will be used to interact with the wifi clients, it has to have an IP address and a network mask (No default gateway or DNS are needed on this interface) in my case, I assigned 192.168.200.1 as this IP is on the same subnet as the Wifi clients will be and will be used as a default gateway for them to reach Internet / other networks.
An important caveat to keep in mind: while Ifconfig allows to set the static ip address it will not persist after a reboot. Netplan allows to set up a wifi network interface, but it also requires the access point information, which is not applicable for our case.
To overcome this So here is what I did: started the wlan interface: sudo ifconfig wlan0 up then created a startup script. (ifconfig to set up the wlan interface to be executed every time the device boots up)
- Created the file:
sudo nano /usr/local/bin/wlan0staticip.sh - Added this line:
ifconfig wlan0 192.168.200.1 netmask 255.255.255.0 - Save.
- Made the file executable, running:
sudo chmod +x wlan0staticip.sh
Note: where you save the file really up to you.
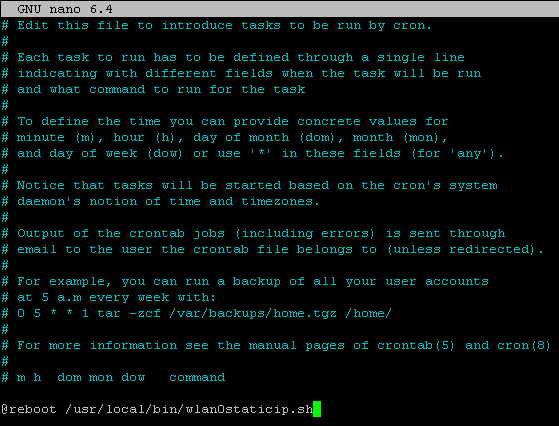
Now, let’s create the task to run this script at every reboot.
run: sudo crontab -e
Add: @reboot /usr/local/bin/wlan0staticip.sh
HOSTAPD
To set up the hostapd configuration, first, create the hostapd.conf file in the /etc/hostapd/ directory. This file contains the configuration for the WLAN controller, RADIUS client, and RADIUS server. To create the file, run the following command: sudo nano /etc/hostapd/hostapd.conf
# Set country code
country_code=US

# Set wireless interface
interface=wlan0

# Set network name
ssid=Xeneize

# Set channel
channel=6

# Set driver
driver=nl80211

# Require IEEE 802.1X authorization & EAP
ieee8021x=1
auth_algs=3
wpa=2
wpa_key_mgmt=WPA-EAP
rsn_pairwise=CCMP

# The own IP address of the access point (used as NAS-IP-Address)
own_ip_addr=40.0.0.10

# RADIUS authentication server
auth_server_addr=40.0.0.10
auth_server_port=1812
auth_server_shared_secret=p@ssw0rd!

# RADIUS accounting server
#acct_server_addr=40.0.0.10
#acct_server_port=1813
#acct_server_shared_secret=p@ssw0rd!


# RADIUS SERVER
# INTEGRATED EAP SERVER
# Use integrated EAP server instead of external RADIUS authentication server
eap_server=1

# Path for EAP server user database
eap_user_file=/etc/hostapd/eap_user

# CA certificate (PEM or DER file) for EAP-TLS/PEAP/TTLS
ca_cert=/etc/hostapd/ca.pem

# Server certificate (PEM or DER file) for EAP-TLS/PEAP/TTLS
#server_cert=/etc/hostapd/hostapd.server.pem

# Private key matching with the server certificate for EAP-TLS/PEAP/TTLS
# This may point to the same file as server_cert if both certificate and key
# are included in a single file. PKCS#12 (PFX) file (.p12/.pfx) can also be
# used by commenting out server_cert and specifying the PFX file as the
# private_key.
private_key=/etc/hostapd/server.pfx

# Passphrase for private key
private_key_passwd=p@ssw0rd!

# Enable CRL verification.
# Note: hostapd does not yet support CRL downloading based on CDP. Thus, a
# valid CRL signed by the CA is required to be included in the ca_cert file.
# This can be done by using PEM format for CA certificate and CRL and
# concatenating these into one file. Whenever CRL changes, hostapd needs to be
# restarted to take the new CRL into use.
# 0 = do not verify CRLs (default)
# 1 = check the CRL of the user certificate
# 2 = check all CRLs in the certificate path
check_crl=0

# Fragment size for EAP methods
fragment_size=1400


# RADIUS AUTHENTICATION SERVER CONFIGURATION
radius_server_clients=/etc/hostapd/radius_clients
radius_server_auth_port=1812
To clarify, the files to be included in the hostapd configuration file (hostapd.conf), need to be prepared beforehand.ca.pem file: This file needs to be obtained from the RADIUS Server and contains the Certificate Authority (CA) that issued the RADIUS Server’s certificate. If this is a multi-tier PKI, make sure the whole CA chain is included in the pem file. Once you obtain this file, copy it to the /etc/hostapd directory.server.pfx file: This file contains the RADIUS Server’s certificate and private key pair that is used to encrypt the communication with the client. You will need to create or obtain this file and place it in the /etc/hostapd directory.radius_clients file: This file contains a list of RADIUS clients that are allowed to connect to the RADIUS Server. In your case, since the RADIUS Server and the Wi-Fi access point are on the same device, you can use the loopback address (127.0.0.1) as the client. So, create a file called “radius_clients” in the /etc/hostapd directory and add the following line to it:
# RADIUS client configuration for the RADIUS server
127.0.0.1 p@ssw0rd!eap_user, this file contains the list of user credentials and the auth method required. In my case I just included one user and the TTLS-PAP as auth protocol. (see reference for other supported protocols)
# HOSTAPD USER DATABASE FOR INTEGRATED EAP SERVER
# Phase 2 (tunneled within EAP-PEAP/TTLS/FAST) users
# username    authentication method   password
*	TTLS
"sammy"       TTLS-PAP                "user_password" [2]
Next, apply this configuration to the hostapd service:
root@raspberrypi:/etc/hostapd# hostapd hostapd.conf
wlan0: interface state UNINITIALIZED->COUNTRY_UPDATE
wlan0: RADIUS Authentication server 40.0.0.10:1812
wlan0: interface state COUNTRY_UPDATE->ENABLED
wlan0: AP-ENABLED
Then unmask, enable and start the hostapd service:
root@raspberrypi:/etc/hostapd# systemctl unmask hostapd.service
Removed "/etc/systemd/system/hostapd.service".

root@raspberrypi:/etc/hostapd# systemctl enable hostapd.service
Synchronizing state of hostapd.service with SysV service script with /lib/systemd/systemd-sysv-install.
Executing: /lib/systemd/systemd-sysv-install enable hostapd

root@raspberrypi:/etc/hostapd# systemctl start hostapd.service
Finally, the Raspberry needs to be capable of forwarding packets that are meant for other destinations (other than itself). Run sudo nano /etc/sysctl.conf and uncomment the next line to enable packet forwarding for IPv4 net.ipv4.ip_forward=1 and restart the device to confirm all services and configuration are ok and it should be good to go 🙂
Once the device starts, run the following commands to make sure everything is working as expected.sudo ifconfig to confirm the wlan0 comes up with the desired IP address.sudo systemctl status dnsmasq to confirm the dnsmasq service is up and running.sudo systemctl status hostapd to confirm the hostapd service is up and running.
Happy repro’s!
The combination of these devices and the hosted service provides a wide variety of supported scenarios. For instance, the system can support EAP-TLS and PEAP authentication protocols. To add or modify support for these protocols, one can edit the ‘eap_user’ file. Here is a reference guide for configuring the file: https://web.mit.edu/freebsd/head/contrib/wpa/hostapd/hostapd.eap_user
For EAP-TLS
Supporting EAP-TLS for user martin
# Phase 1 users
"martin"	TLS

PEAP-MSCHAPv2
"martin"	MSCHAPV2	"password"	[2]
Download the Raspberry PI OS tool from here: Raspberry Pi OS – Raspberry Pi
Hostapd config file: https://web.mit.edu/freebsd/head/contrib/wpa/hostapd/hostapd.conf
Dnsmasq file example: https://github.com/imp/dnsmasq/blob/master/dnsmasq.conf.example